Get rid of Windows 11 File Explorer’s “Start Backup” advertisement

The latest version of Windows started to aggressively advertise OneDrive’s backup feature in File Explorer, where it would prominently show a “Start backup” button as part of the navigation bar:

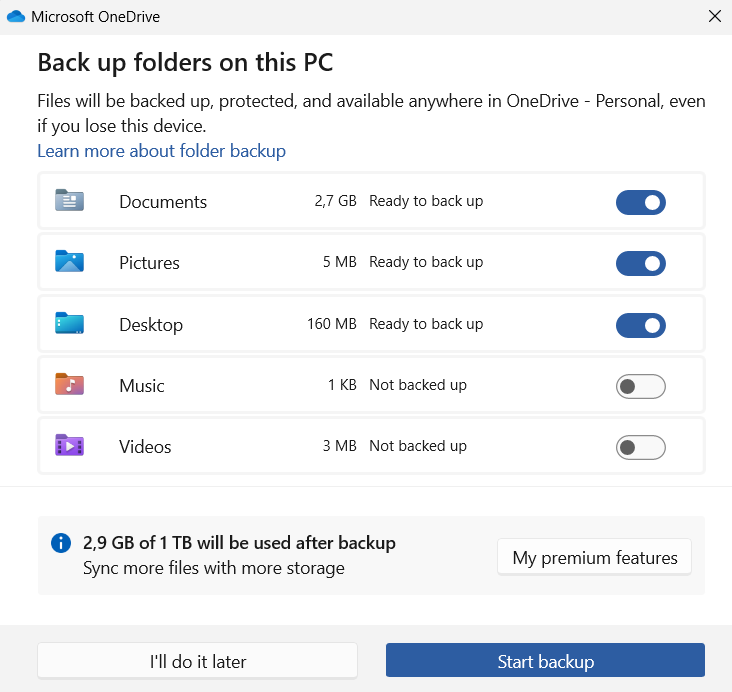
Clicking on this button, even accidentally, will trigger an annoying dialog, that, with it’s preselected options, might start a backup of data to Microsoft’s cloud that you did not really intend:

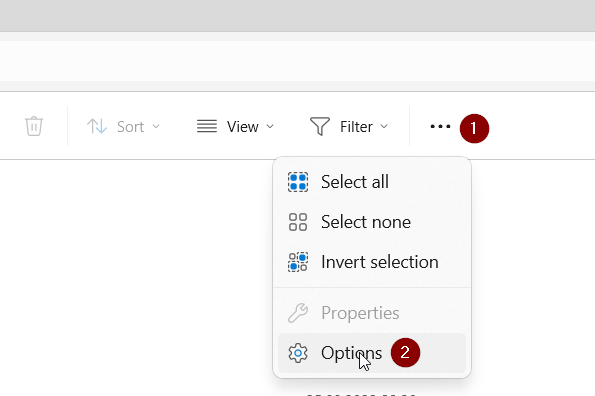
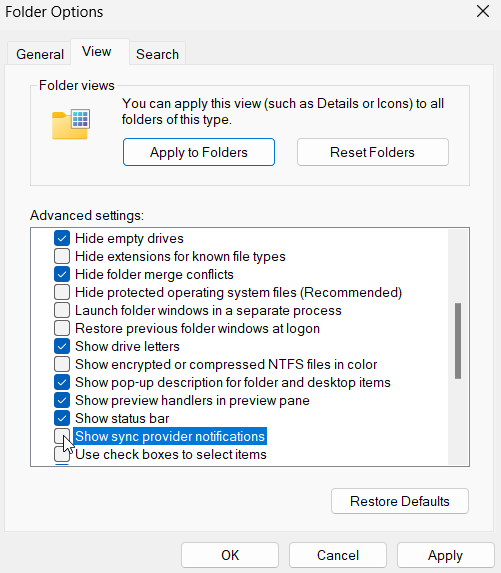
This notification can be turned off by a hidden setting inside File Explorer’s settings. Open Explorer’s settings and from there select the “View” tab, find the “Show sync provider notifications” setting and un-check it.

After logging out and logging in again, the notification is gone. To be honest, I don’t know which other notifications I am now missing, but so far I have not noticed anything important.

Btrfs raid1 vs. mdadm raid1

RAID is about up-time. Or about the chance to avoid having to restore from backup if you are lucky. RAID is not a backup, though. There are also no backups, just successful or failed restores. (Those are the most important proverbs that come to my mind right now.)

Given that I’m obsessed with backups, but also “lazy” in the sense that I want to avoid having to actually restore from my backups, I’ve been using RAID1 in my data store for at least 15 years now. For the first 12 years of them, I’ve been using ext3/4 on top of mdadm managed RAID1. About 3-4 years ago, I switched most of my storage to Btrfs, using the filesystem’s built-in RAID1 mode.

In this article I want to give a short reasoning for this. I initially wanted this article to kick-off a mini-series on blog-posts on Btrfs features that you might find usable, but due to some discussion on Mastodon, I already previously posted my article about speeding up Btrfs RAID 1 up using LVM cache. You should check that one out as well.

Continue reading “Btrfs raid1 vs. mdadm raid1”

overlay2 for Docker within an unprivileged LXC container

For my Jenkins installation I use a Docker agent inside an LXC container. I want this container to be unprivileged, so that the host is somewhat protected from misconfiguration (not deliberate attacks). The default setup works fine, but after a bit of experimenting, I noticed that I was soon running out of disk-space. The reason for that turned out that Docker had fallen back to using the vfs storage backend instead of overlay2, which basically creates a copy for every layer and every running container.

# docker info | grep Storage
 Storage Driver: vfs

Further investigation showed, that this was due to the fact that the container was unprivileged. Short experiments with making the container privileged also yielded issues with cgroup management of the outer docker container on the host. So what was the reason for the issues? It seems that the ID mapping / shifting of the user IDs prevented the overlay2 driver from working.

Therefore I decided to try to mount a host directory as a “device” into the container’s /var/lib/docker. But using the shift=true option, this again fails, since this way the underlying filesystem is shiftfs and not plain ext4 (see supported filesystems for various storage drivers). So a solution without “shift” is required.

Shifting UIDs is done by a fixed offset for a container, in my case it’s 1,000,000. You need to figure this out for your system, but likely it’s the same. So by creating the external storage directory with this as owner and then mounting it inside the container without shifting, things start to get working.

export CONTAINER_NAME=mycontainer
export DOCKER_STORAGE_DIRECTORY=/mnt/pool/mycontainer/var-lib-docker

mkdir -p "$DOCKER_STORAGE_DIRECTORY"
chown 1000000:1000000 "$DOCKER_STORAGE_DIRECTORY"

lxc config device add "$CONTAINER_NAME" var-lib-docker disk source="$DOCKER_STORAGE_DIRECTORY" path=/var/lib/docker

# important, security.nesting is required for nested containers to work!
lxc config set "$CONTAINER_NAME" security.nesting=true

After this docker info | grep Storage finally showed what I wanted:

# docker info | grep Storage
 Storage Driver: overlay2

Add SSH host key fingerprint to Jenkins for Git checkouts

I have a self-hosted Gitea instance, and also operate my own Jenkins instance. On the Jenkins instance, strict host-key checking is enabled. When adding the first reference to a Git repository hosted on my server, the following error appears:

Failed to connect to repository : Command "git ls-remote -h -- ssh://git@<myserver>:22222/martin/jenkins-test-docker-pipeline.git HEAD" returned status code 128:
stdout:
stderr: No ECDSA host key is known for [myserver]:22222 and you have requested strict checking.
Host key verification failed.
fatal: Could not read from remote repository.

Please make sure you have the correct access rights
and the repository exists.

The reason is that since it’s the first time I’m accessing a repository on this server, so the SSH host fingerprint is not in the known_hosts file for this SSH connection. Since I run this installation of Jenkins inside a Docker container and I don’t want to manually edit files in the file-system, I rely on setting the appropriate settings in Manage Jenkins > Security > Git Host Key Verification Configuration. This is set to Manually Provided Keys.

The easy solution is to set it to Accept First Connection. But I want to be stay on the manual mode. The easiest way to get the SSH host fingerprint via ssh-keyscan (-p 2222 is for specifying the SSH server port, which is a non-standard port in my case):

ssh-keyscan -p 22222 myserver

The output looks like this:

# myserver:22222 SSH-2.0-OpenSSH_9.1
[myserver]:22222 ssh-rsa AAAAB3NzaC1yc2EAAAADAQABAAABAQC085ixMnTlpr0pxXmkeJ6X479mbW/9PGDeUvD8hnG7EVUn3WsnnSG8yZkmU+jzg2W+xmFd7WIdaYLt6UcGvCS3RZIye68+qu64UToKX6CdTQOWyj6z9kd8tLoPBobsBd7tRyGaXU4c4UkCR5M44KhYtbQz0bgL7u+sL0z+R3lbOVyXaYPiSmUf/Wsd8fA2VcdWHkXJx0MMNMSVj/hgkZR7RfHzP4SZSqRLhn/AzIdx4DDuyGyPbVxu1ppnFtumRwlBkgat9UpMWkelREhcUdJtrZO1KPpA6DOkxIH8X/WtXyWToS9EjPb8FVTvzdjG2C4Zi0DkogH3no9vQcXLiihz
# myserver:22222 SSH-2.0-OpenSSH_9.1
[myserver]:22222 ecdsa-sha2-nistp256 AAAAE2VjZHNhLXNoYTItbmlzdHAyNTYAAAAIbmlzdHAyNTYAAABBBDfTT9eEpDmd7ToGAorTW1X9uuJVhZl+KX9phmTpTy2e8U7l31jWn2TnKlXOp5oKgivpQ2cVjcTyazyrFB7MhgI=
# myserver:22222 SSH-2.0-OpenSSH_9.1
[myserver]:22222 ssh-ed25519 AAAAC3NzaC1lZDI1NTE5AAAAIFoEzPpEWApszceLM/jWHvAbrTppjsTzftw79yTSS5Po
# myserver:22222 SSH-2.0-OpenSSH_9.1

It only makes sense to copy the non-comment lines (the ones not starting with a # to the configuration).

Now Git checkouts to this repository should work, once you have configured the appropriate credentials.

Enable RSA-based public-keys for ssh when accessing legacy devices

When accessing old devices that are not yet using modern encryption algorithms, current Ubuntu installations might reject connection due to the signature algorithm for the public keys being disabled, e.g.

sign_and_send_pubkey: no mutual signature supported

You can enable this on a per-command level by adding the following option to your SSH command line:

ssh -o PubkeyAcceptedKeyTypes=+ssh-rsa ...

As an alternative you can add this permanently for a host by adding it to the host’s configuration in your $HOME/.ssh/config:

Host myhost
  PubkeyAcceptedKeyTypes +ssh-rsa

This also works for other key types like ssh-dss.

Note: In general you only should do this if you access legacy devices where you have no possibility to upgrade to state-of-the-art encryption algorithms. Those algorithms got deprecated for a reason. Therefore always do this on a per-command or per-target-host level instead of blindly enabling those algorithms in your global SSH config.

Speeding up Btrfs RAID1 with LVM Cache

Logical Volume Manager 2 (lvm2) is a very powerful toolset to manage physical storage devices and logical volumes. I’ve been using that instead of disk partitions for over a decade now. LVM gives you full control where logical volumes are placed, and a ton of other features I have not even tried out yet. It can provide software RAID, it can provide error correction, you can move around logical volumes while they are being actively used. In short, LVM is an awesome tool that should be in every Linux-admin’s toolbox.

Today I want to show how I used LVM’s cache volume feature to drastically speed up a Btrfs RAID1 situated on two slow desktop HDDs, using two cheap SSDs also attached to the same computer, while still maintaining reasonable error resilience against single failing devices.

Creating the cached LVs and Btrfs RAID1

The setup is as follows:

  • 2x 4TB HDD (slow), /dev/sda1, /dev/sdb1
  • 2x 128GB SSD (consumer-grade, SATA), /dev/sdc1, /dev/sdd1
  • All of these devices are part of the Volume Group vg0
  • Goal is to use Btrfs RAID1 mode instead of a MD RAID or lvmraid, because Btrfs has built-in checksums and can detect and correct problems a little bit better because it can determine which leg of the mirror is the correct one.
Continue reading “Speeding up Btrfs RAID1 with LVM Cache”

flexget on Ubuntu 10.04 LTS

If you follow the official instructions to install flexget with existing Python 2.6 and python-virtualenv, than you might encounter the following problem:

flexget@host:~$ flexget/bin/flexget
Traceback (most recent call last):
File "flexget/bin/flexget", line 5, in
from pkg_resources import load_entry_point
File "/home/flexget/flexget/lib/python2.6/site-packages/distribute-0.6.10-py2.6.egg/pkg_resources.py", line 2655, in
working_set.require(__requires__)
File "/home/flexget/flexget/lib/python2.6/site-packages/distribute-0.6.10-py2.6.egg/pkg_resources.py", line 648, in require
needed = self.resolve(parse_requirements(requirements))
File "/home/flexget/flexget/lib/python2.6/site-packages/distribute-0.6.10-py2.6.egg/pkg_resources.py", line 546, in resolve
raise DistributionNotFound(req)
pkg_resources.DistributionNotFound: jsonschema>=2.0

At least on my system, there seems to be a jsonschema < 2.0 installed in the system site packages. This can be prevented by altering the initialization of the virtual Python environment as follows:

virtualenv --no-site-packages ~/flexget/

HOWTO: Fully encrypted vServer with Ubuntu 12.04

Update 2022-05-16: Today I learned that there are two official tutorials by Hetzner for Ubuntu 20.04. You might want to follow them instead:


In this blog post I am going to demonstrate how to easily setup a virtual server at Hetzner. This setup will work for most other vServer operators as well, but some adjustments may be required. Prerequisite is that you are able to access the console of  the server while booting, as you need to be able to enter the passphrase. You also need to be able to boot into some sort of “Rescue System” for the setup. This is no in-place setup. In Hetzner’s “Robot” this is pretty easy.

One thing to consider regarding security: fully encrypting a vServer might seem… senseless, as the host operator can easily copy the whole memory of the VM while running and extract the key this way. True. There is no way around this fact. My reason for wanting a fully encrypted system is more of the way that I want to be sure that the data is encrypted on the storage system. I want to protect from being unable to ever fully wipe the persistent data from disk in case I cancel the VM, the VM gets moved to a new host, or a failed disk is sent in to the manufacturer. For me, this is a compromise I can accept. YMMV.

You can also try this HOWTO under VirtualBox with the System Rescue CD ISO images. Actually, that’s where I verified all steps are working.

So, let’s dive into the fun of the HOWTO. BEWARE! THIS TUTORIAL WILL WIPE ALL DATA ON YOUR VSERVER! I TAKE NO RESPONSIBILITY IF YOU LOSE DATA!  IT MIGHT ALSO NOT WORK FOR YOU. USE THIS AT YOUR OWN RISK!

The following steps will partition the disk, setup LVM and LUKS, install Ubuntu 12.04 and prepare the system for reboot. Most parts can be copied line-by-line. Please beware that there are some parts in this tutorial that needs to be adjusted: UUIDs of partitions, hostname, username, and most important: network setup.

Continue reading “HOWTO: Fully encrypted vServer with Ubuntu 12.04”

OCZ Vertex2, Linux, and ancient nForce 430 chipset

Today I finally received my brand-new Ocz Vertex2 OCZSSD2-2VTXE120G 120GB and eagerly wanted to install it in my 4-year-old HP workstation which currently is running Ubuntu 10.10 exclusively.

After setting up the alignment according to some tutorials I found online, I started the setup process. Shortly after starting the copy step of the installation, the whole process came to a grinding halt with filesystem errors. Looking into the kernel debug messages it seemed like SATA commands were causing errors. After checking hardware, cables and switching SATA ports, I began researching the issue and soon found that the issue might be fixed in the next firmware version of the drive. So I wanted to upgrade from 1.23 to 1.24, which could only be done in Windows…

After installing a trial of Windows 7, I finally wanted to upgrade the firmware, but the drive was not detected, but was accessible. The release notes indicated that I would need to switch to AHCI mode. After several attempts, includig a BIOS update, I realized that there was no way to do this with my old hardware, as my nForce 430 chipset simply doesn’t support it.

So my only remaining option was to simply try the kernel arguments I read to be the fix for 1.24 with the 1.23 hardware.

So, if you add the following kernel option during installation and afterwards for every boot, the disk seems to work quite well (source):

libata.force=norst

Actually, this forces the ATA driver in Linux to not issue any reset commands on the bus. I really don’t understand why this improves/fixes the problem, but it seems the device has issues when being reset on my chipset. I can also notice this that in 2 out of 3 attempts if I reboot the PC the disk is not recognized any more before I reboot again.

Despite these issues, the SSD now runs with astonishing performance with the suggested 32 head / 32 sector alignment, and a 512kB partition alignment scheme. After an initial TRIM with hdparm‘s wiper.sh I enabled -o discard for my ext4 partition and could also verify using hdparm that this results in the sectors being trimmed. Please note, that you need to manually compile and install the latest hdparm version on Ubuntu 10.10, as the included version fails with the very long free block list and doesn’t handle splitting the sectors in multiple requests. The latest version doesn’t have this issue any more.

Remaining Windows Vista/7 “rearm count”

It is a well-known fact, that it is possible to extend the initial grace period for activating your (hopefully legitimate!) copy of Windows from 30 days to 120 days by using slmgr. This is a tool that is intended to allow the preparation of image-based installers for enterprise use by allowing to reset the initial grace period up to 3 times.

If you tend to forget the number of times you already reset the counter, you can easily check for yourself: simply run

slmgr -dlv

to get detailed licensing information, including the number of remaining re-arms and remaining grace time.

If you want to know when exactly your grace period runs out, use

slmgr -xpr

Note: This simply gives you more time, it won’t prevent you from having to buy and/or activate Windows. Re-arming is not a bug, it works as intended and is an important tool for use in corporate environments.