One of the very first posts back in 2005 on this blog was me warning about the dangers if too much knowledge (especially in e-mails, newsgroups [back then], Twitter [now], etc.) is hidden behind URL-shortening services that might
And now it’s time for a Category-1 problem (again): Google’s URL shortening service goo.gl seems to be shutting down for good according to 9to5google. It was not possible to add new short-links for quite some time now, but by end of year, it seems that old links will break.
Let’s hope Google at least keeps the domain, otherwise this might turn into a category-2 problem. (The article mentions that Google will reply 404 on the links, which indicates they intend to keep the domain around at least in the beginning.)
My PC uses about the same amount of power if it’s turned off and if it’s in sleep mode (about 1W). Hence I started to use sleep more often, since the difference in time from wanting to work to being able to work is significant.
One annoying point, though, was that while I want to be able to wake my PC with the keyboard, I don’t want it to wake on every little mouse movement, since those simply happen due to vibrations by me walking around or the kids jumping nearby. Still, I don’t want to reach for the power-button since it’s harder to reach, hence I have enabled “Wake on USB” in BIOS.
The easy solution for this is, that you need to disable “Allow this device to wake the computer” off for your mouse, but not for your keyboard in the Window Device Manager.
Step-by-Step
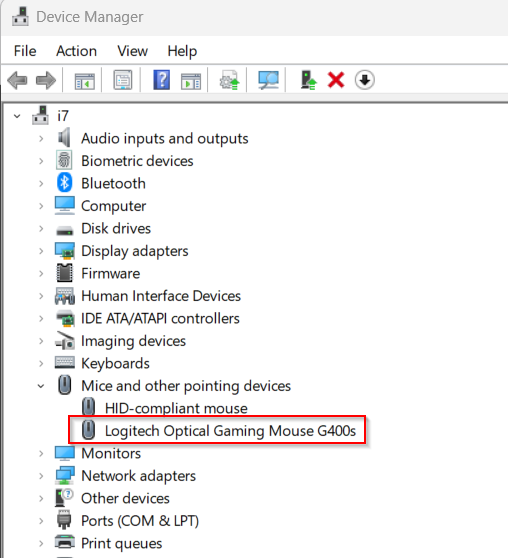
1. Open Device Manager
2. Identify your mouse
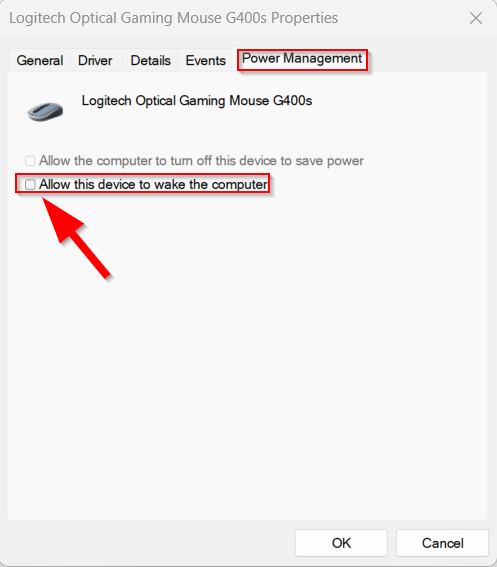
3. Right-click and select “Properties”
4. Open the Power Management Tab and then un-check “Allow this computer to wake the computer.
I use a Dell 9020m Micro-PC as “terminal-server” for development. It has a small SSD, but also a larger HDD attached.
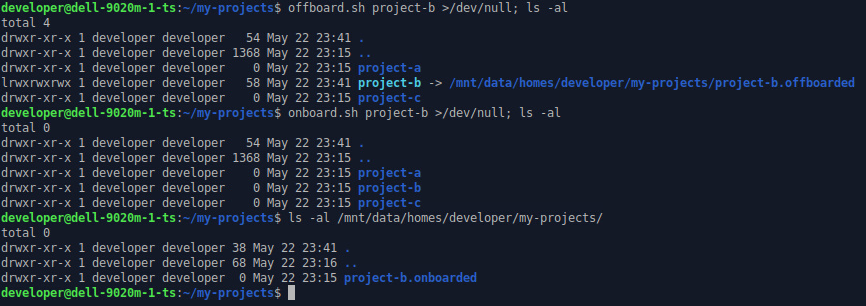
I’ve created two simple bash-scripts that help move projects I currently don’t work on from SSD to HDD. They add symlink to the “off-boarded” location so that I can basically keep on working on them, but with slower I/O. When I want to work on the project again (and need the I/O speed), the project is moved back to the SSD (“on-boarding”).
To make re-off-boarding fast, the on-boarded state is kept on the HDD and re-used when off-boarding the project again.
These two simple scripts have been released under MIT license on GitHub.
Login with Google. Login with Facebook. It’s convenient. No need to invent and remember a new username, a new password. It’s almost a single-sign-on (SSO) to the entire internet.
The obvious downside, however, is that within a second you could see yourself locked out of many of your accounts. Just imagine that for some reasons your identity provider (Google, Facebook, Apple, …) decides that you have violated their terms of service. And locks you out of your account, and as a consequence also of all the services that you used the account for. Too few people consider this, in my opinion. It can happen quite fast (recent example involving AI).
Of course you can then try to fight this lock and argue your way back into the account. But you need to be very lucky to even get some human’s attention on the other side. Unless you somehow manage to make a huge buzz on it on (social) media, I bet your chances of getting the issue resolved are pretty thin. Google is even proud that you can’t call them in order to sort this thing out (see Google’s Account Recovery support page; yes, they are right that you should not use any external password recovery service).
Don’t get me wrong. I love SSO in a company context. But there is an admin that I can talk to in case something goes wrong, and if my account is terminated, it likely is because my employment is terminated. I just don’t like it for my personal data, where some (perceived) violation of some terms of service of one of the big companies might lock me out of all my other unrelated accounts as well.
I very strongly believe, that anyone making themselves a gatekeeper for things outside their own business should be, by law, required to not terminate your account without any recourse. Yes, they can stop doing business with you. But they should not be allowed to stop authenticating you.
Passkeys as alternative?
For a while, it seemed that Passkeys would become a convenient and secure way of signing in to services. I, however, only started to consider them once KeepassXC with 2.7.7 started offering support for managing them inside the password store, so that I could backup it and would not be depending on a hardware device that could break or that I could lose.
Unfortunately, it really seems that the big companies are using this technology yet again to lock you in their ecosystem, creating exactly the same problem for me as I have with the “Login with…” system. The following articles are a very good summary of what went wrong and also why the current standard and the insistence to resident keys have made this system basically unusable for the concerns I mentioned above.
Maybe good support in password stores (like Bitwarden/Vaultwarden, KeepassXC, Keepass2Android) can maybe still make this a viable alternative. The cryptographic advantages of passkeys over normal username/password are great, so I really think it can be an improvement in the future.
Staying with usernames and password manager (for now)
For now, I’ll still stay with my own setup using my self-managed password stores. With all the work and dangers this incurs as well (backups, distribution, availability).
And I’m starting to agree – a password manager gives a better experience than passkeys.
That’s right. I’m here saying passwords are a better experience than passkeys. Do you know how much it pains me to write this sentence? (and yes, that means MFA with TOTP is still important for passwords that require memorisation outside of a password manager).
So do yourself a favour. Get something like bitwarden or if you like self hosting get vaultwarden. Let it generate your passwords and manage them. If you really want passkeys, put them in a password manager you control. But don’t use a platform controlled passkey store, and be very careful with security keys.
The latest version of Windows started to aggressively advertise OneDrive’s backup feature in File Explorer, where it would prominently show a “Start backup” button as part of the navigation bar:
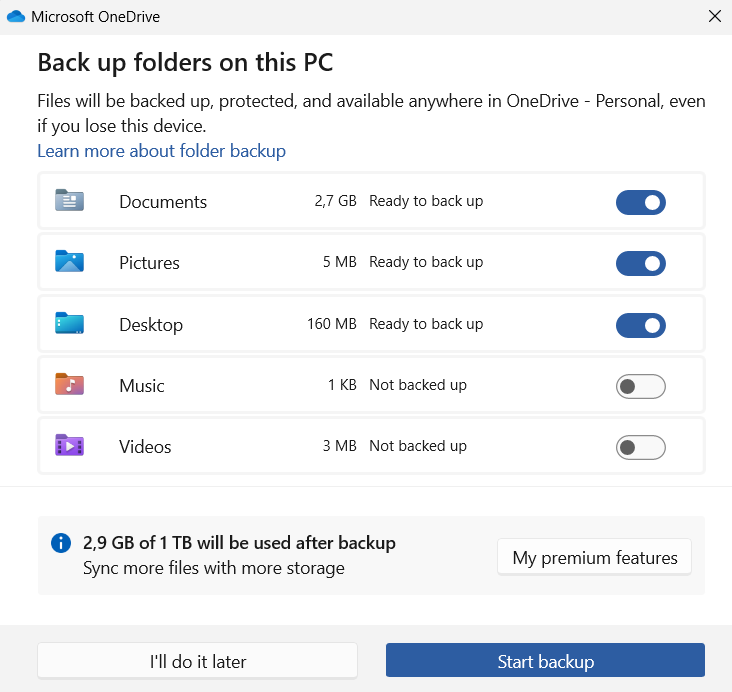
Clicking on this button, even accidentally, will trigger an annoying dialog, that, with it’s preselected options, might start a backup of data to Microsoft’s cloud that you did not really intend:
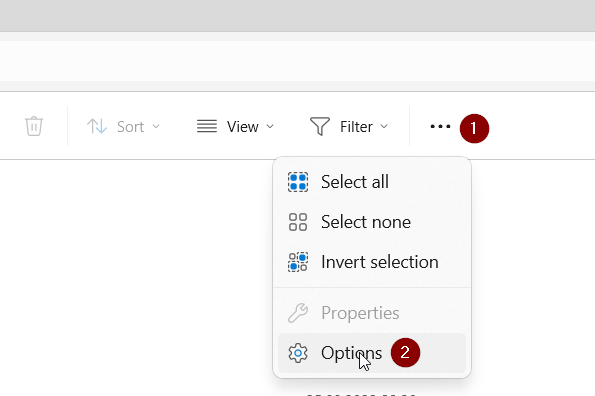
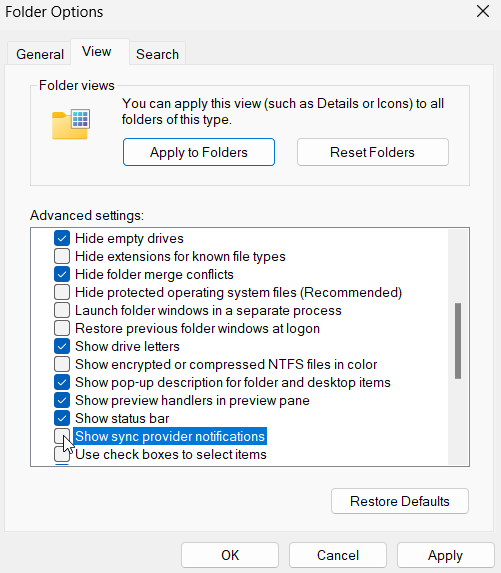
This notification can be turned off by a hidden setting inside File Explorer’s settings. Open Explorer’s settings and from there select the “View” tab, find the “Show sync provider notifications” setting and un-check it.
After logging out and logging in again, the notification is gone. To be honest, I don’t know which other notifications I am now missing, but so far I have not noticed anything important.
RAID is about up-time. Or about the chance to avoid having to restore from backup if you are lucky. RAID is not a backup, though. There are also no backups, just successful or failed restores. (Those are the most important proverbs that come to my mind right now.)
Given that I’m obsessed with backups, but also “lazy” in the sense that I want to avoid having to actually restore from my backups, I’ve been using RAID1 in my data store for at least 15 years now. For the first 12 years of them, I’ve been using ext3/4 on top of mdadm managed RAID1. About 3-4 years ago, I switched most of my storage to Btrfs, using the filesystem’s built-in RAID1 mode.
In this article I want to give a short reasoning for this. I initially wanted this article to kick-off a mini-series on blog-posts on Btrfs features that you might find usable, but due to some discussion on Mastodon, I already previously posted my article about speeding up Btrfs RAID 1 up using LVM cache. You should check that one out as well.
Needing an invite to join, the apps, etc. all gives a certain sense of privacy over on Blueskye. But that’s just show. The API that powers the app is publicly available, no authentication needed. Every post made on Bluesky can be queried publicly by everyone, even without having an invite.
Mario Zechner has demonstrated this well with his low-effort (but amazing!) tool Skyview (source-code available on Github).
It’s a pure client-side web application that requires the link to a Bluesky posting as input and then renders the entire discussion thread around it. Pure client-side, no server, no authentication. Amazing!
Screenshot of Skyview with one of my own postings (in German), reminding about the lack of privacy of postings on Bluesky.
That’s not a problem in itself, but just keep it in mind.
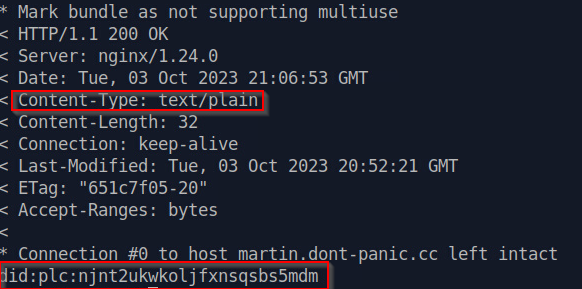
TLDR: Beware that there must be no newline at the end of the .well-known/atproto-did file and that the content type needs to be text/plain. echo -n to the rescue instead of vim.
I recently received an invite to Bluesky and so far I’ve enjoyed the experience. Early-day Twitter feeling. Can recommend to check it out if you get an invite.
One very intriguing thing is that Bluesky allows for your own domain to be your handle. So I decided to go with @martin.dont-panic.cc.
The process is described in a blog post by Bluesky. There are two main options to verify your domain ownership, DNS TXT entries or an HTTPS request to https://martin.dont-panic.cc/.well-known/atproto-did (in my case). Since everyone is doing DNS, I wanted to try out HTTPS/.well-known. (Of course, there needs to be a martin.dont-panic.cc DNS entry to get to the web-server, but no special TXT header for the verification.)
I wanted to serve the file as a static file in the filesystem via nginx. So I set up the following static nginx configuration:
server {
        listen 443 ssl;
        server_name martin.dont-panic.cc;

        root /var/www/cc/dont-panic/martin/;
        index index.html;
        location / {
                # First attempt to serve request as file, then
                # as directory, then fall back to displaying a 404.
                try_files $uri $uri/ =404;
        }
        location = /.well-known/atproto-did {
                default_type text/plain;
        }
        # ... lots of SSL stuff omitted ...
}
So basically this tells nginx to try to serve any existing file or fall-back to directory or 404. It forces text/plain for the /.well-known/atproto-did file, since otherwise it is serves as application/octet-stream which violates the requirements.
Then I used vim to simply create the file and validated that the content of the file was accessible correctly via curl.
Looked good, so hit this verify button. And it failed. After a few retries, i decided that maybe it’s because of the final newline that end of the file?
For my Jenkins installation I use a Docker agent inside an LXC container. I want this container to be unprivileged, so that the host is somewhat protected from misconfiguration (not deliberate attacks). The default setup works fine, but after a bit of experimenting, I noticed that I was soon running out of disk-space. The reason for that turned out that Docker had fallen back to using the vfs storage backend instead of overlay2, which basically creates a copy for every layer and every running container.
# docker info | grep Storage
 Storage Driver: vfs
Further investigation showed, that this was due to the fact that the container was unprivileged. Short experiments with making the container privileged also yielded issues with cgroup management of the outer docker container on the host. So what was the reason for the issues? It seems that the ID mapping / shifting of the user IDs prevented the overlay2 driver from working.
Therefore I decided to try to mount a host directory as a “device” into the container’s /var/lib/docker. But using the shift=true option, this again fails, since this way the underlying filesystem is shiftfs and not plain ext4 (see supported filesystems for various storage drivers). So a solution without “shift” is required.
Shifting UIDs is done by a fixed offset for a container, in my case it’s 1,000,000. You need to figure this out for your system, but likely it’s the same. So by creating the external storage directory with this as owner and then mounting it inside the container without shifting, things start to get working.
export CONTAINER_NAME=mycontainer
export DOCKER_STORAGE_DIRECTORY=/mnt/pool/mycontainer/var-lib-docker

mkdir -p "$DOCKER_STORAGE_DIRECTORY"
chown 1000000:1000000 "$DOCKER_STORAGE_DIRECTORY"

lxc config device add "$CONTAINER_NAME" var-lib-docker disk source="$DOCKER_STORAGE_DIRECTORY" path=/var/lib/docker

# important, security.nesting is required for nested containers to work!
lxc config set "$CONTAINER_NAME" security.nesting=true
After this docker info | grep Storage finally showed what I wanted:
# docker info | grep Storage
 Storage Driver: overlay2