HOWTO: Fully encrypted vServer with Ubuntu 12.04

Update 2022-05-16: Today I learned that there are two official tutorials by Hetzner for Ubuntu 20.04. You might want to follow them instead:


In this blog post I am going to demonstrate how to easily setup a virtual server at Hetzner. This setup will work for most other vServer operators as well, but some adjustments may be required. Prerequisite is that you are able to access the console of  the server while booting, as you need to be able to enter the passphrase. You also need to be able to boot into some sort of “Rescue System” for the setup. This is no in-place setup. In Hetzner’s “Robot” this is pretty easy.

One thing to consider regarding security: fully encrypting a vServer might seem… senseless, as the host operator can easily copy the whole memory of the VM while running and extract the key this way. True. There is no way around this fact. My reason for wanting a fully encrypted system is more of the way that I want to be sure that the data is encrypted on the storage system. I want to protect from being unable to ever fully wipe the persistent data from disk in case I cancel the VM, the VM gets moved to a new host, or a failed disk is sent in to the manufacturer. For me, this is a compromise I can accept. YMMV.

You can also try this HOWTO under VirtualBox with the System Rescue CD ISO images. Actually, that’s where I verified all steps are working.

So, let’s dive into the fun of the HOWTO. BEWARE! THIS TUTORIAL WILL WIPE ALL DATA ON YOUR VSERVER! I TAKE NO RESPONSIBILITY IF YOU LOSE DATA!  IT MIGHT ALSO NOT WORK FOR YOU. USE THIS AT YOUR OWN RISK!

The following steps will partition the disk, setup LVM and LUKS, install Ubuntu 12.04 and prepare the system for reboot. Most parts can be copied line-by-line. Please beware that there are some parts in this tutorial that needs to be adjusted: UUIDs of partitions, hostname, username, and most important: network setup.

Continue reading “HOWTO: Fully encrypted vServer with Ubuntu 12.04”

OCZ Vertex2, Linux, and ancient nForce 430 chipset

Today I finally received my brand-new Ocz Vertex2 OCZSSD2-2VTXE120G 120GB and eagerly wanted to install it in my 4-year-old HP workstation which currently is running Ubuntu 10.10 exclusively.

After setting up the alignment according to some tutorials I found online, I started the setup process. Shortly after starting the copy step of the installation, the whole process came to a grinding halt with filesystem errors. Looking into the kernel debug messages it seemed like SATA commands were causing errors. After checking hardware, cables and switching SATA ports, I began researching the issue and soon found that the issue might be fixed in the next firmware version of the drive. So I wanted to upgrade from 1.23 to 1.24, which could only be done in Windows…

After installing a trial of Windows 7, I finally wanted to upgrade the firmware, but the drive was not detected, but was accessible. The release notes indicated that I would need to switch to AHCI mode. After several attempts, includig a BIOS update, I realized that there was no way to do this with my old hardware, as my nForce 430 chipset simply doesn’t support it.

So my only remaining option was to simply try the kernel arguments I read to be the fix for 1.24 with the 1.23 hardware.

So, if you add the following kernel option during installation and afterwards for every boot, the disk seems to work quite well (source):

libata.force=norst

Actually, this forces the ATA driver in Linux to not issue any reset commands on the bus. I really don’t understand why this improves/fixes the problem, but it seems the device has issues when being reset on my chipset. I can also notice this that in 2 out of 3 attempts if I reboot the PC the disk is not recognized any more before I reboot again.

Despite these issues, the SSD now runs with astonishing performance with the suggested 32 head / 32 sector alignment, and a 512kB partition alignment scheme. After an initial TRIM with hdparm‘s wiper.sh I enabled -o discard for my ext4 partition and could also verify using hdparm that this results in the sectors being trimmed. Please note, that you need to manually compile and install the latest hdparm version on Ubuntu 10.10, as the included version fails with the very long free block list and doesn’t handle splitting the sectors in multiple requests. The latest version doesn’t have this issue any more.
Novatel Merlin U740 using only Windows 7 onboard tools

I have lost the install CD of my Novatel Merlin U740, an older PCMCIA UMTS card. As a consequence I got no “Mobilink Connection Manager” after installing Windows 7 on my notebook. Fortunately I found this guide by Novatel Wireless which explains how to connect using only on-board tools in Windows Vista, by setting up a dial-up connection. It still works in Windows 7. The important part is to set the APN as part of the driver’s initialization string.

The telephone number you have to set is *99#, which should be provider-independent.

The following settings are for yesss.at only:
Username: web
Passwort: web

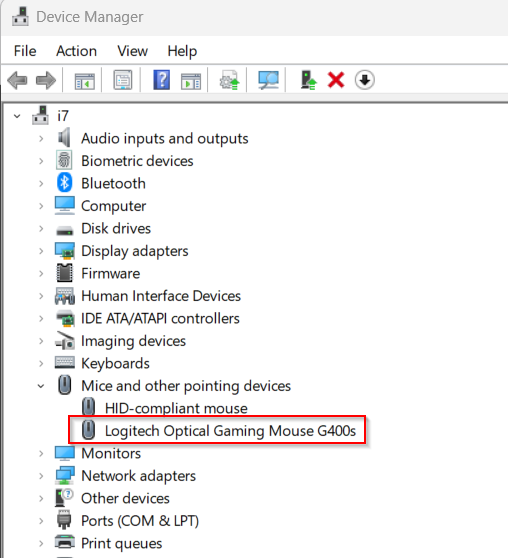
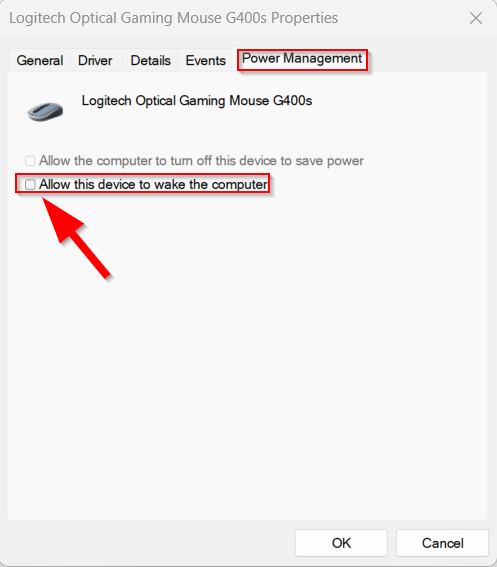
Remember to set the APN as part of the driver’s connection string in Window’s “Device Manager” as described in the PDF.

Again, for yesss.at this is: AT+CGDCONT=1,"IP","web.yesss.at"

For this to work properly, the SIM must not have a PIN set, as otherwise the SIM will be locked and the dialer cannot dial out. For me this is ok, as it is a pre-paid card which can hardly be abused if it gets stolen, but your situation might be different, so please consider the security implications. (I suspect that it should be possible to unlock the SIM card somehow using the AT+CPIN=1234 command, but I did not research how to separate several initialization strings, as it did not work immediately.)

The solution works quite well for me, even under Windows 7. Disadvantage is that there is no way to tell the signal strength and exact mode of operation (despite the color-coded status led on the Merlin U740).

Sharing and Synchronizing Data Across Multiple Computers

I have several computers, one at the office (Windows Vista), one at home (Gentoo Linux), and one notebook (Windows XP). On most of them I want to share a common set of files, including letters and other documents, but also Miranda. This time I am going to tell you how I keep my shared data in sync using Unison, PuTTY, and OpenSSH, using a dedicated server as central hub.

(Note: this is a rather advisory level HOWTO, not a step-by-step, command-by-command tutorial. It might give you some ideas nevertheless.)

Continue reading “Sharing and Synchronizing Data Across Multiple Computers”

phpMyAdmin with mod_fcgid

I am currently migrating my server configuration away from mod_php towards mod_fcgid (the successor of mod_fastcgi), as this allows me to use different users for executing scripts in different directories. I use this to have every hosted virtual domain using its own system user. This should (in theory) prevent one buggy application to take over all other hosted domains as well.

I though faced one problem: I could not get phpMyAdmin working and this was a requirement of one of my clients. phpMyAdmin kept popping up the authentication dialog over and over again when using HTTP Basic Authentication.

After searching some time, I noticed that, when using PHP in CGI mode, the authentication data is not passed over to the script by default. A FAQ entry of phpMyAdmin brought the solution to this issue: a ReWrite Rule was needed for the directory containing phpMyAdmin:

RewriteEngine On
RewriteRule .* - [E=REMOTE_USER:%{HTTP:Authorization},L]

Suddenly phpMyAdmin worked 😉

Increasing Performance of VMWare Virtual Machines on External Devices

By default, VMware Workstation 5.x use a memory mapped file for backing the RAM of the simulated machines. This eases the pressure on the system’s page file. If you host the virtual machine on an external drive, however, this can become a bottle neck, especially if the external device is slow (e.g. USB 1.1, flash, etc.).

As described in this VMware Knowledge Base Article, you can turn of VMWare’s behaviour to use a memory mapped file and force it to use the system’s paging mechanism instead. To do so, you just have to add

mainMem.useNamedFile=FALSE

to your virtual machine’s configuration file (.vmx).

Apache: Force SSL for a Directory Using .htaccess and mod_rewrite

To force SSL on a given directory using .htaccess, use the following code. It requires mod_rewrite enabled in Apache. Adjust the path in the RewriteRule to match the full qualified URL of the HTTPS-domain.


RewriteEngine On
RewriteCond %{SERVER_PORT} !443
RewriteRule ^(.*)$ https://www.example.com/$1 [R=301,L]